I am blessed to be able to flip homes with my family.
It offers me the chance to work with my husband, son
and family; develop a career I never thought I would have;
and spread my creative wings. I like to add special
designer touches to each home to give it a personal feel.
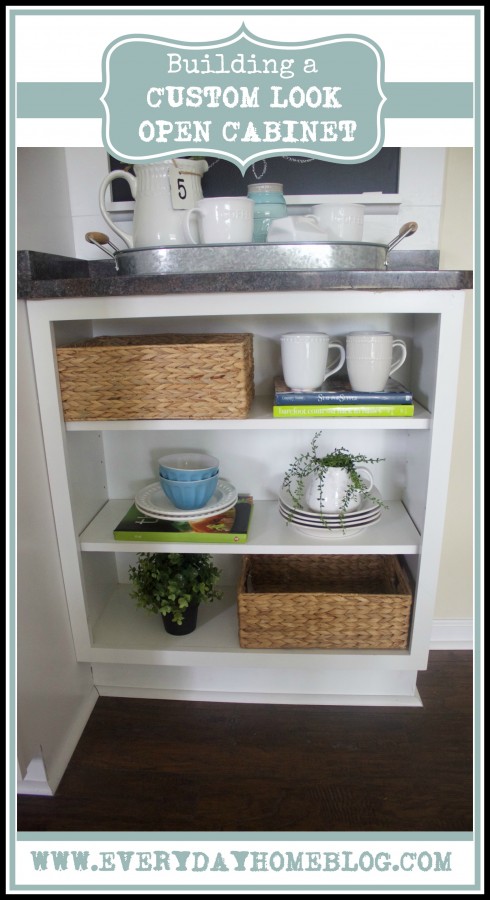
A few days ago, I shared the details of how I created
a Custom Chalkboard. Now, I want to show you what is
under the chalkboard – a Custom Look Open Shelf.

Custom Look Open Shelf Cabinet | The Everyday Home
………………………………………….
When I flip a home, I generally rely on stock cabinets.
Our homes sell between $125,000 – $135,000.
So there simply isn’t a budget for custom cabinets.
That said, I do a few things to give them a custom feel.
Adding crown moulding is one thing. The difference is like
night and day.

How to Build a Custom Look Shelf Cabinet | The Everyday Home
I also try to create open shelving if the floor plan and
space permits. This kitchen offered the perfect location
for an open cabinet which created a cute Coffee Station.

How to Build a Custom Look Shelf Cabinet | The Everyday Home
This project was about as easy as you could imagine.
The secret is that I used an UPPER cabinet which was only 12″ deep.
I wanted this section of cabinet to be slightly higher than the
remainder of the kitchen countertops/cabinets.
So I purchased a 30″ tall cabinet, and created a simple
2″x6″ base to sit it on – for a total of a 36″ height.

How to Build a Custom Look Shelf Cabinet | The Everyday Home
Some basic quarter-round moulding gave it a finished look.
For the top, I had our countertop contractor cut a remnant
piece of granite that would create the perfect surface for
coffee, or even wine.

How to Build a Custom Look Shelf Cabinet | The Everyday Home
So for the price of a stock cabinet and some remnant granite,
I created a Custom Look Open Shelf Cabinet.

How to Build a Custom Look Shelf Cabinet | The Everyday Home
So how did a stock cabinet become an open shelf cabinet?
Simple, I took the doors off.
😀

How to Build a Custom Look Shelf Cabinet | The Everyday Home
Once the cabinet was in place, I added the custom chalkboard
above to complete the total look.

How to Build a Custom Look Shelf Cabinet | The Everyday Home
The beauty of this project is that you can create an accent
cabinet anywhere, and almost any size.

How to Build a Custom Look Shelf Cabinet | The Everyday Home
I will be adding these cabinets in my Farmhouse Style Kitchen
very soon and I can’t wait to get started on that project.
Do you have a place in your own kitchen for a cabinet
like this? Or, do you have another area where this project
would add additional storage? I’d love to hear where you
would use this.
Thanks for letting me share.
xxoo, Barb
…………………………………..
Don’t Forget to Share !!!
Do you follow me on Pinterest, Facebook and Twitter?
I would love for you to share these images to your fave social media sites.
Simply click on the upper left of images and click the social media icon of your choice.
…………………………………….
Thank you for spending a few
minutes of your day here with me.
You can follow along with
The Everyday Home here….
Here are some of the Link Parties I may be sharing this post with.
You can find more parties on my Linky Party Page.


This is a good tip! We leave one or more upper cabinets “door-less” in our condos because the kitchens are so small.
View CommentWhat a great idea to use the top cabinets for the tighter spaces! I have been trying to think of a way to add some bookcases in a couple of places around my house without breaking the bank. I think maybe this would be a viable alternative.
View CommentThis turned out lovely and you styled it perfectly! Well done! If you are at all interested in joining in on one more link party, I host Making Broken Beautiful every Thursday thru Sunday and I would be honored to host your talents! It is a furniture and decor link party. I hope you have a great weekend!
View CommentSmiles!
Terry
http://thecuratorscollection.wordpress.com
Making Broken Beautiful
I love the cabinet and the chalkboard, too! Thanks for sharing at Merry Monday.
View CommentClever and simple way to enhance any decor! Thank you for sharing it on the #HomeMattersParty
View Comment