
I am participating in Chari’s Sunday Favorites at
Hop on over to this beautiful lady’s blog and check out
some past posts.
I am sharing my Breakfast Room Hutch Re-Do.
A really simple project that made a big
difference in my Kitchen.
I will be announcing the winner’s of the pretty majolica-style pumpkins tomorrow, and also sharing a really cute “Before and After” with a Halloween theme.
Enjoy Your Weekend….Barb

It’s Monday! So you know what that means?
Back to School… Back to Work… Back to Reality…and Metamorphosis Monday! This weekly event is sponsored by
Susan @ Between Naps on the Porch.
Please make sure you stop by Susan’s place to see her fantastic blog, and also – you can get a full list of all Met Monday Participants. There are always some wonderful “Before and After” pics and projects.
I know you are getting tired of seeing my breakfast room. But, it seems like the projects which I have been focused on as of late, are the kitchen and this area. I keep thinking….one day I will be through… one day I will be through….
LOL Who am I kidding!
I wanted to share my latest project…painting and
“upholstering” my Craigslist hutch. It was pretty enough before – although dated looking. The back is stamped Ethan Allen 1969.
“upholstering” my Craigslist hutch. It was pretty enough before – although dated looking. The back is stamped Ethan Allen 1969.

From the time I found the piece online, I envisioned it painted the same matte black as my breakfast table and chairs.
 Some sanding and two coats of paint later…it turned out great. I love how it changed the whole look and feel of the hutch, and how the vintage porcelain knobs now pop. But, I also felt something was missing. It needed some “umph.” Ya’ll just know how I love “umph.”
I had looked at several wallpapers…and decided that maybe upholstered boards with tufting and covered buttons would be the perfect finishing touch. In the end, I went with simplicity in both fabric choice and application. “Umph” I like…time consuming projects…not so much. 🙂

I chose a damask style fabric in a warm sage green that tied in with my painted kitchen cabinets. The “upholstery” part was easy, and only took a few minutes to complete.
I started with a paper template of each section of the hutch since they were all different sizes…
 ( By the way, I keep a roll of this heavy-duty paper around at all times. It’s great for craft projects and decorating projects of all kinds. It’s available in the paint section where tape, etc. is sold, and is very cheap.)
To apply the cut-out fabric…I relied on an old-time product…undiluted liquid starch.
 Using the sponge (you could also use a brush) – I simply applied a generous amount of starch right onto the back of the hutch. After laying the fabric on top, I used my hand to smooth out the fabric. You may need to reapply the starch to certain areas, as needed. This was a thicker fabric, and a little harder to work with. If you have never tried a project using starch, you might want to start with a thinner cotton fabric. There are some great ideas for using starch at www.linit.com .

Here’s the first section of fabric applied.

…and the bottom section – only one more area to go.
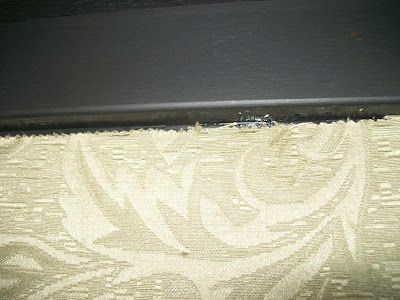
Don’t worry about the frayed or raw edges…I have an easy fix for that.

A few inexpensive packages of coordinating bias tape and a hot glue gun will clean things up beautifully.

Here’s the finished project…took me about 45 minutes total…to include getting a re-fill on Coke, re-starting Ice Age for Cole …and shooing Baby Lily off the hutch and wiping starch off her tail.
It was time to put my treasured collection of pink and white transferware back in…
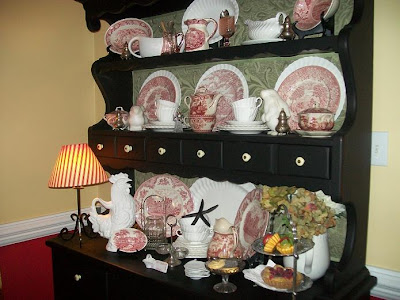
The green fabric was the perfect compliment to the dishes. I added some silk hydrangeas in tones of sage and cream in the white pitcher.

Close-up of bottom shelf…

It was also time to address the top of the hutch….I found this beauty at Ross for $11. Eleven bucks!!!
 I also added a vintage Bread Box, a french bread basket, a grouping of veggies and breads in a tiered stand, and a green and white transferware plate. hmmmm….maybe I will tweak it some more, but for now it works.
  I love my breakfast room and kitchen – especially at night. The color changes to a warm, golden tone which just glows and feels so welcoming. I think the hutch project was one that totally changed the look and feel of this space.
I have often wondered why I am so pulled to my kitchen. I recently read a quote on another blog I just discovered…which by the way I love… Warm Pie, Happy Home .
The quote was from Dolly Parton and said..
“When I was a little girl, I always wanted to be in the kitchen because it was warm, and that’s where mother was. You never lose that feeling.”
My best childhood memories are sitting at the kitchen table, doing my homework, watching Mama cook…telling her about my day…and feeling like the “special” child because she asked me to taste what she was cooking. She would always ask…”does it need anything?” 🙂
Yes, my kitchen is the heart of my home – just like my Mama’s.
I hope you have enjoyed seeing my “Before and After” Hutch project. Please make sure you hop on over to Susan’s and visit the other participants, as well.
Have a Great Monday…Barb


You did an amazing job on your hutch. I have a piece that I was thinking of “upholstering” the back of. Thanks for the tutorial. You make it sound very easy.
It would be great to have you join us at Seasonal Sundays.
– The Tablescaper
View CommentBeautiful hutch made even more beautiful for your care in updating her to fit your family. I am always drawn to black furniture. I love the quote from Dolly. She is so down to earth and really “hit the nail on the head”.
View CommentThe hutch is beautiful, Barb and you made it even look more beautiful. Love your red and white dishes against the sage…Christine
View CommentBarb, awesome job on the hutch! I love that you made it yours and coordinated it with your own decor. From the upholstery, to all of the accessories…I love it all!
View CommentHow beautiful the hutch is now that it’s black. It never ceases to amaze what paint can do. Love the fabric in the back of hutch, and it makes your dishes sparkle!
View CommentI love this! Great job!
Jenny
View Commenthttp://www.simcoestreet.blogspot.com
Hi Barb…
Wowzer…what a beautiful transformation, my friend! I love the black and the fabric that you added to the back of the hutch! I would have never thought to use starch to adhere the fabric to the wood…what a great idea! I sooo appreciate the tutorial on how to do it!
Well sweet friend, your hutch looks absolutely gorgeous! I love how you accessorized it!!! Thank you so much for sharing your beautiful hutch with us for the Sunday Favorites party this week!
Warmest autumn wishes,
View CommentChari
I am loving your Ethan Allen hutch and the different ways you have decorated it! I have my eye on a hutch like this and was also wanting to paint it black. Everyone is using chalk paint but I think I just want to keep it simple. Can you tell me the name and type of paint you used? Did you prime first? If so what did you use? Did you use any protective top coat or any process to finish it?
View Comment