DIY Dollar Store Halloween Cup
Making your own custom designed cups and mugs is easy – even if you don’t have one of those expensive vinyl cutting machines. See how I used a common office supply to create the permanent design on this cute Halloween Coffee Cup.

One of these days, I am going to break down and buy myself one of those vinyl cutting machines like a Cricut or a Silhouette. One of these days. I think I am balking because its just one more thing to learn, one more thing to store, one more thing – well, you get the hint.
But what happens when you find these cute designs created from one of these machines and you want to create something similar? You go to the Dollar Store and buy a plain white cup and a black Sharpie Marker.
Here is my easy tutorial.
…………………………………………..
![]()
I am taking part in a “Spooktacular Dollar Store Crafts” Event today. Several other bloggers are linking up with me, so please make sure you visit each of them by clicking the images below.
………………………………………………………….
* some of the following links are #affiliates. For more info please read my Policies & Disclosures.
Resources You Will Need:
Similar Projects from The Everyday Home
Create Your Own Halloween Plates
DIY Homemade Plates on a Spooky Halloween Mantel
Let’s Get Started…

As you can see, the supplies needed are basic. Now, let me preface this in saying – I will show you how I did it but will recommend a different way for you.
Here is the Printable design I used…

CLICK HERE TO DOWNLOAD THIS FREE DESIGN
You may have to size it smaller or larger depending on your cup or mug.
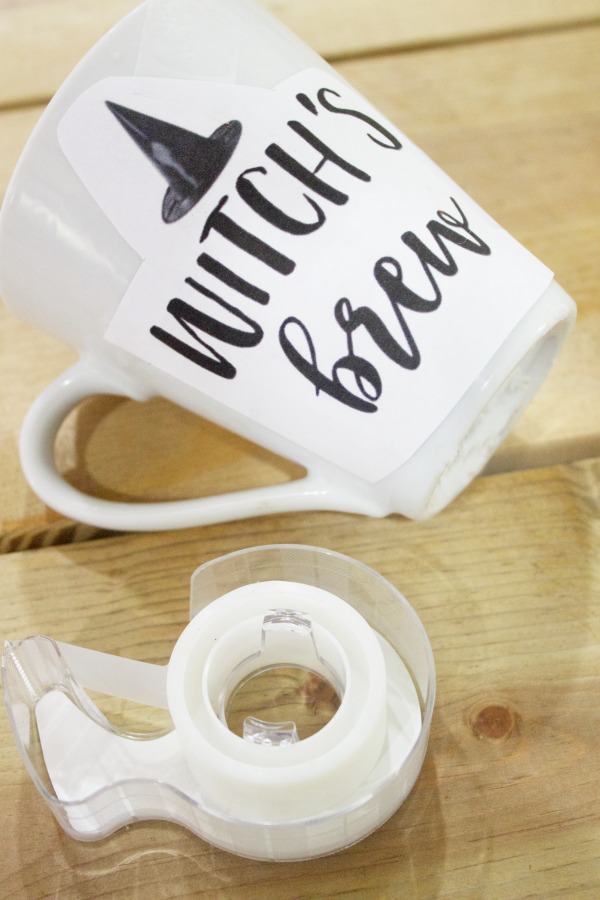
2.) Using a pencil, color over the back of the design using a heavy hand so the lead on the paper is as dark as possible. Cut out the design and adhere in place on the cup with tape.
Trace over the design so the ink on the back of the paper design will transfer to the mug. Now here is where I would suggest you use carbon transfer paper. The pencil lead was very hard to see.
3.) Once you have the outline of the design, use your Sharpie Marker to fill it in. If it smears, have a q-tip handy dipped in alcohol.

Now you need to make the ink permanent and that is a super simply process. Allow your design to air dry, preferable overnight then place your mug on a cookie sheet in a heated 375 degree oven and bake your cup at 375 degrees for about 30 mins.

And that’s all.
A cute little personalized mug. You can add any type of design. I think I will even personalize one for my sweet daughter-in-law who absolutely loves Halloween. 🙂

An easy-peasy project using a plain Dollar Store cup and sharpie marker. I hope you enjoyed this project.
xxoo, Barb
………………………………………..

Do you follow me on Pinterest, Facebook, Twitter & Instagram?
I would love for you to Pin & Share this image on your fave social media sites.
Simply scroll the center of the image and click the icons of your choice.

……………………………………………
Thank you for spending a few
minutes of your day here with me.
You can follow along with
The Everyday Home here….
PINTEREST FACEBOOK TWITTER INSTAGRAM
Here are some of the Link Parties I may be sharing this post with.
You can find more parties on my Linky Party Page.
” …everyday ideas for your home & life! “
………………………………………
Please join me and all of these other fabulous bloggers participating in this
Dollar Store Halloween Crafts Blog Hop.
![]()


Thank you for hosting this. It is so much fun. I love your idea of the Halloween mug. It is a great way to do it if you don’t have a Cricut or a Silhouette(I don’t have either one).
View CommentSo cute! I love cute mugs! Visiting from the blog hop!
View CommentSo glad you made it over here and hope you stop by often. 🙂
View CommentOMG, so cute!!!!?
View CommentLove your mug, Barb! I’m sharing some of my Dollar Tree creations. Thanks for hosting! Hugs…Debbie
View CommentVery interesting post and amazing mugs.
View Comment