I know y’all get tired of hearing me yak week after week. I get tired of
hearing myself yak. 
So to give you some relief from my extraneously long yak sessions, I like to
bring in some awesomely talented Bloggers, so they can share some of their
awesomely talented projects with you.
You’ve met Leslie with House on the Way, my wonderful Crafts Contributor.
And you’ve met Kelley at My Soulful Home, my talented Gardening Contributor.
Well, it is my extreme pleasure to introduce you to Jen from Girl in the Garage.

I met Jen in person at haven, and as soon as I found out she did fabulous
Furniture Makeovers, I knew she would be a great addition to
The Everyday Home. I know you will enjoy having Jen and her furniture
makeover skills here with us.
So take it away Jen!
==+=====+=====+=====+=====+=====+=====+==
Hi, I’m Jen from Girl in the Garage. My blog is all about furniture makeovers,
DIY home decor, and crafts. Sometimes I also share the adventures of my
sweet little family; recently my hubby and I celebrated 7 years of marriage
and we have two inquisitive little boys who keep life exciting. When I’m not
playing with trains or Legos, I love turning old and boring furniture into
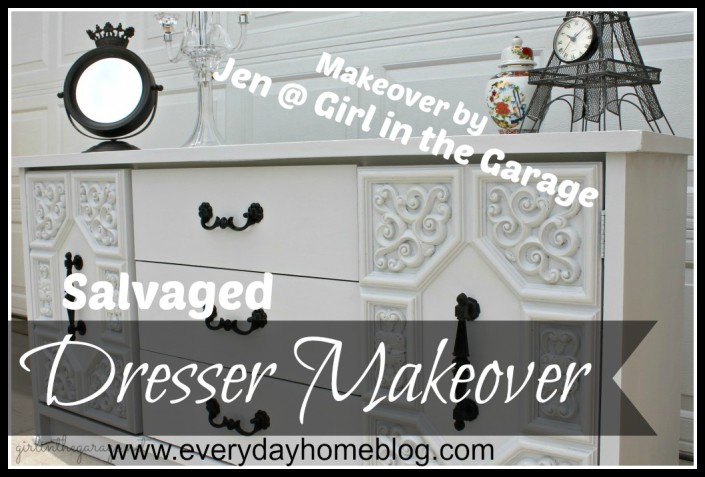
pieces you’d be proud to display in your home. I’m excited to share this
Salvaged Dresser makeover today with you, and you may see me around
here sharing more projects in the future.
(Thanks for inviting me over, Barb!)

Since I’ve owned this salvaged dresser, I have had such a range of feelings
for it. First, sadness… then hope… then discouragement… then apathy…
then apprehension… then hope… then frustration… then hope… then
relief and satisfaction. And now a little pride.
I remember distinctly one warm day last September. I was heading to a
somewhat unfamiliar area to look at a small dresser that I saw on Craigslist
and I had my mother and two boys in the SUV with me. I took a wrong turn
and ended up in a semi-ghetto area. (You know the kind of neighborhood!)
Then, on the side of the curb I saw this huge, sad, ugly dresser. I cannot even
imagine what kind of hideously 80’s bedroom decor this was once a part of.
It looked like someone had just thrown it out there because all of the drawers
were out and one was busted on two of its sides, and the metal track was bent.
But I immediately fell in love with the doors!

Since I was just starting out in blogging and low on funds for projects
(aren’t we all budget conscious these days?) the idea of a free, salvaged dresser
to experiment with (even in its terrible condition) was SO exciting. Much to
my mother’s dismay and embarrassment, she got out and helped me quickly
attempt to load it up… thankfully a man was driving by and jumped out to
help us.

We did finally end up making it to look at the Craigslist dresser, but needless
to say, it did not compare to my newly acquired curbside treasure. I’m not
sure if it’s a blessing or a curse that I see so much potential in old ugly
furniture!
First I started working on the broken drawer. Wood glue, clamps, and
several nails did the trick – and a swift hammer straightened out the track.
Then I started to paint it (the same pale gray as my armoire) but I didn’t get
very far. The dresser was disgustingly filthy, there were a million little
grooves on the doors, and I got discouraged.

Then the cold weather came and I found myself spending less time in the
garage and more time inside doing crafts or smaller painting projects. I got
bored with the dresser because of the slow progress, which was my own fault.
Things got piled on it and I forgot about it for a few months.
With spring’s arrival and renewed optimism, I decided I had to finally finish
this dresser. It was taking up way too much room and I was sick of looking at
it partially finished. Have you ever had a project that seemed to take forever?

I did a lot of sanding and painted it with about billion coats of gray, especially
on the doors which seemed to lose the paint in all its grooves. Then I decided
to paint the handles with Valspar glossy black spray paint (3 coats of black
followed by a spray protectant) and painted the inside of the drawers black
also. When it was all done, I added about 4 coats of matte soft touch
polyurethane.

To me, it gives off a little “French luxury” vibe, or a little throwback
Hollywood glamour.

C’est magnifique, non?

I also added some trim to the sides where the wood was damaged at the
bottom. It was so easy to do and adds some extra detail.

As perfect as it would look in my bedroom with the armoire, I took it to
my booth this weekend. I hope someone buys it who loves it as much as I
do! Do you ever get emotionally attached to your furniture, especially things
that you’ve spent a lot of time and effort on? I don’t ever plan to spend 9
months repairing and painting a dresser again, that’s for sure!
You can find me anytime here:
Girl in the Garage Blog / Facebook /
Thanks again for having me here, Barb!
Jen
==+=====+=====+=====+=====+=====+==
Thanks, Jen! C’est Magnifique is absolutely right? I am always amazed at
the power of paint. You did an amazing job, and it was a pleasure for you to
share your Dresser Project here with us. I look forward to your next
Furniture Makeover project next month.

Have you checked out all the fabtastic projects shared today at
If not, you are really missing out on some great inspiration.
I also have something in store for you tomorrow which I hope you will
be just as excited about as I am. See you then…
xxoo, Barb


Yeay, my post is up! Thanks Barb! 🙂
View CommentYayyyyy! Yes it is. I LOVE it. Thanks for sharing and welcome to The Everyday Home. xxoo
View CommentYou did an amazing job on this dr
View Commentesser what a huge improvement, it must be bitter sweet to sell this!
What a cutie! Jen and the dresser! That’s a wonderful save that someone will love!
View CommentCheers!,
Barbara
I love this makeover! Such a night and day difference! Great job Jen!
View CommentBeautiful transformation!
View Commentxx
Anne